Thursday, March 31, 2011

Weekly Nail Blog Round-Up!

Stacie from KawaiiNailArt had the great idea to do a Weekly Nail Blog Round-Up to feature our favorite nail art designs from the current week. If you wanted to be a part of the weekly round up click here.

 
Jen showed us how to use our Konad plates in a more inventive way with this manicure.


Stacie was in an angelic mood this week with her angel wing manicure.


 Emily let her chocolate tendencies get the best of her with these Cadbury Nails that look good enough to eat!


To celebrate her starting a blog Claire is having an OPI Giveaway.


Shella was inspired by furry creatures and this lovely little bear manicure was the result.


 Last but not least, For Your Nails Only's Spring Flowers free hand painted nails!

And I am pretty sure you are already familiar with my butterfly manicure. If you haven't already here is another look- & I recently went back and made a tutorial so be sure to check that out!


Bundle Monster Full Sized Image Comparrison!


Wow! Bundle Monster has been updating left and right- it would be so hard to keep up without Cherish keeping me posted! Bundle Monster gave us a little comparrison of the full sized images from their first set and their new set. You can definitley see they are bigger this time around. When I finally get them in my hands, I will do a review asap and compare the sizes from both their sets and the konad plates. They also said that they will be announcing a contest tomorrow so I will update you on that once they let us know more details. =)

Working Like A Machine

My vaguely metal inspired attempt at layering stamps manicure, for your viewing horror pleasure:
SAM_7835
I do think it looked more passable in real life. Macro exposes the hideous uneveness of the white "cog" stamps. They're jumping around all over my nails!

The title has a little double meaning, actually. Why didn't any of you nice, grown up bloggers tell me that GCSEs were so heniously coursework filled? It's so haaaard. *selfish whine*
Any fellow Year Eleven students out there care to comiserate?

SAM_7836

 I'm also saddened to hear that some of my favourite bloggers are having troubles, as well. I've posted before about The Gloss Goss and also Scandalously Polished is going on hiatus, which is a big shame. I can totally understand why Ange is doing it, I just feel bad that some people have pushed her to that. Which reminds me, I still haven't announced the winner of my Bella Sugar giveaway. I'll get on it, promise.

What's up with this world lately? Those two aren't the only ones, I'm thinking of more who have been recieving nasty commnents, abuse and the like and who have gone on hiatus because of it but they're less beauty and more alternative Japanese fashions so I thought there was no point mentioning them :/ I'm glad I have a lovely group of followers who comment on my mindless keymash. <3 Thanks guys!

The Lazy Student - "Invisible Nail Art"

Did you think I'd forgotten about this series? I haven't, don't worry. I just needed time to create more school appropriate nail designs.

This style of school appropriate nail polish is heavily reliant on Konad/Fauxnad, whatever you choose to use. Stamping plates look clean and professional, aren't time consuming to do and crucially don't use a lot of nail polish. Creating a design with stripers or acrylic is far more obvious because the nature of the materials means that you have to use a lot more, thus your design/rule breaking is far more obvious. Having said that, nail decals or stickers work nicely as well, like so:


For an ultra subtle look, use a light coloured polish - pastels are even better. This is virtually undectectable, save for your own eyes, and any mistakes aren't obvious. I did a design using Nails Inc Brompton Place (a baby pink) but it was a pain to photograph because it was light.
SAM_7636
Twisted my hand so you could see it a little better.
SAM_7638
 If you wanted to go that way, you could easily stamp all five fingers and get away with it. When I use darker colours, I tend to only stamp one or two as if I decorate any more, I run the risk of being caught.

Darker colours work nicely, though, for a contrast and a bit of edginess.
SAM_7802
These are all images from a Bundle Monster plate. I stamped two designs on my thumb, in different colours (a black by Miss Sporty and Nails Inc Queensgate Mews) and another two on the middle finger. Poor attempt at layering. I need to start working on that.
SAM_7806
Whether you've gone dark, light, or used a nail decal, you can easily paint the undecorated nails with a sheer polish if you don't want to go completely naked.
SAM_7807SAM_7811
There is a fourth way, which is to stamp french tips onto your tips. I did that in the main post (linked at the beginning of this post) and that also has a better picture of the light stamping polish in action.

Again, I'll keep adding nail designs to this post. The eventual idea is to have a little store of nail designs here which any visitor can quickly refer to. I'll update once this has happened (probably not for a long while yet!)

Is anyone else interested in the upcoming Bundle Monster plates? I like the fact that they've listened to feedback and added backing to the plates (anyone who's ever tried them could attest to their sharpness) and have also increased the size of their full nail designs. Finally. Even Konad's are a bit small for my thumb.

More Bundle Monster Image Plate Releases!!!!


Here are the newest pictures Bundle Monster released on their Facebook. The new plates will have a blue covering and they will also have a backing this time too to reduce the sharpness. BM also mentioned that the pricing for this set will be $21.99! This set will have 150 images so you will only be paying $0.14-$0.15 per image, which is pretty much the same pricing as the first set at $0.13-$0.14 per image. If you haven't been following along, this new set will have BIGGER images and should be available in about 2 weeks. More updates to come !!! How exciting is it seeing all 25 images plates? I can't contain myself, I want this new set so bad! I already made swatches that I am just waiting to stamp. lol

T-Shirt Cutting


Wednesday, March 30, 2011

Glittery Spring Deco Nail Art Design


Peach Color: Essie - "Van D'Go"
Glitter Color: OPI- "Teenage Dream"
Rhinestones & Butterflies: Ebay.com
Pearls: BornPrettyStore


Oh how I wish I made a tutorial for this look, but I really didn't expect it to turn out this good! I wasn't too sure how I was going to like this color combo but I really like the way it turned out. I tried my Essie polish "Van D'go" that I won in Katrina's giveaway and OMG I loved this polish. I am so suprised how well it looked on my skin tone because I don't find many polishes that do. So I was off to a good start, then I added 2 coats of Teenage Dream which really complimented this color. I was also waiting for spring to use my gold butterflies and I figured it would be the perfect time. (Although were supposed to get a snow storm this weekend, crazy, I know) Then after I added the decorations and applied a coat of my brand new bottle of Seche, I was in love. lol I took these pictures with my Mom's camera which is A.M.A.Z.I.N.G. and it even has a super macro mode which worked so well for taking nail pics. I am going to have to figure out a way to take more pics with her camera. lol I figured I might as well enter this into ThatsSOfresh's Spring Nail Contest although I didn't plan on it. But I just heard about it, the theme works, and it ends April 1st so this is my last chance to enter. The winner will get a $50 giftcard to WowSoCool. If you want to enter, do it now before it ends!

UPDATE: I went back and took this design off two nails because I was desperate to make a tutorial for this look. lol I'm going to update the format of my tutorials page and add this to it.

The PERFECT nail art supplies for beginners! & Under $50 !!

This post is for nail beginners who are interested in nail art and are starting their own collection. With thousands of nail products on the market, it can be really hard to decide which products to purchase. And if you are just starting, it can be even harder to know which supplies to buy first. I have been growing my collection for a few years now but if it was all gone tomorrow and I only had $50, this is what I would buy ...


The Basic Colors
 The first colors you want to buy should be black, white, and your favorite color. I suggest Sinful Colors "Black on Black" and "Snow me White" for your black and white polishes. They can be bought online for $2.50 on their website or Cherry Culture- OR you can buy them at your local Walgreens for $2.00. Not only are they affordable, but they work very well for nail stamping. Another brand I would suggest is Pure Ice which is also $2.oo at Walmart. I've used both of these brands and the quality is very good for the price & I only had trouble with a few of their polishes. Along with black, white, and your favorite color- buy 3-5 other basic colors like blue, purple, red, green, maybe a gold or silver, or whatever your little heart desires. I would also snag a glitter polish. =)

Image Plates

The best deal on image plates that I found are from a company called Bundle Monster. They sell a set of 21 image plates for $17.99. (In a couple weeks they will have also have a new set and I will have to update this post. lol) The image plates contain a total of 133 designs, and with this price, you only end up paying between $0.13-$0.14 per image, compared to Konad which averages $0.99 per image. You might also want to invest in a stamper or else you won't get much use out of your image plates. lol =) I found this one for $3.39.


 The Miracle Top Coat
Seche Vite is a little miracle in a bottle and can be bought at Sally's for $7.99. I am completley obsessed with this top coat and most nail bloggers will agree with me. Seche is different from other top coats in many ways. Firstly, it is very thick, which provides the ultimate protection for your nail color. Secondly, it dries sooo fast, like less than 5 minutes fast, which is quite unheard of for a polish this thick. Lastly, it provides a mirror-like shine over your nails that will last over a week. Not to mention, Seche Vite will not smudge your nail stamping designs. When applied correctly, Seche makes your nails look amazing. In order to acheive these results, you need to apply a thick coat. Also avoid having the brush touch your nails- you want it to glide over the thick layer of polish you are applying.

Some Extra Glitz & Glam
Next I would buy some rhinestones, striper brushes, or any other nail art supply of your choice. Ebay is a good place to find a lot of inexpensive nail art supplies. I also had luck with finding striper polishes in the Dollar Store and some rhinestones at my local craft store. This is the time to buy whatever else you want with the money that is left over. I love anything shiny and blingy so I would go with the rhinestones. Nail stripers would be a good choice too if you wanted to do some freehand work. Abby also mentioned dotting tools, which are great for beginners and are useful in so many ways.

So after all your purchases this is what you will have and how much it would cost. & I love you girls so much I did all the boring math for you lol. =)

8 Nail Polishes .......... x$2 .......... $16
BM Image Plates .................... $17.99
Nail Stamper ............................ $3.39
Seche Vite ................................... $7.99
Rhinestones or Nail Stripers .. $4
GRAND TOTAL: $49.37

Is there anything you would add to this list? Anything you would take out? If you have any other suggestions, please leave them in the comments and I will add them in this post =)

BeautyUK Metallic Eye Sparks Complete Range Amended Review

Some of you guys might remember this post, in which I reviewed BeautyUK's Metallic Eye Sparks and claimed it was the full range. Well, the replacements for my broken sparks arrived not too long ago (kindly sent by the lovely people at BeautyUK, who were very VERY generous - you'll see in a little while!) and I realised that there was actually a sixth colour in the range, a bronze shade.
SAM_7846
SAM_7849*sits with egg on face*
SAM_7847
SAM_7848...yeah. Naturally, I had to reswatch all of them and add the bronze one into the collection! Otherwise, it'd feel lonely. Below I've got some words from my original review.
SAM_7852I really have to purchase some more BeautyUK products past the nail polishes and the eye pencils. I've got my eye on their bright eyeshadow palette.

I love this bronze shade, it's a great highlighter on black girls like myself and looks way less harsh than white near the eye. BeautyUK seem to think of everyone with their products, which is nice.
SAM_7854
The colours are gorgeously unique. I rarely use these without an eyeshadow over the top anyway but the fact is that the pretty remains if you have drier eyelids than me. I like using the silver and the purple near the tear duct, as a quick highlight. All of the pencils fare well as lower lash line liners, as well – because the lower lash line is less mobile than the eyelid, these don’t crease as easily. It makes for a great pop of colour, especially as these shades are pretty special. I love the “lit from within” look that the purple/red and the blue have!
SAM_7853

These are easy to sharpen with the correct sharpener. I’ve sharpened the silver since it’s last outing. It now works well but the formulation is a lot softer than the other four colours – it’s easy to apply too much. Shame, because it looks really good on the eyelid.

Where these excel, in my opinion, is as a base for matte eyeshadows. I have a TON of mattes that are basically pigmentless (which is why I need to get my ass down to Inglot, quick sharp) unless you layer them 2838319 times. This is hard to do over a conventional primer as you just end up wiping away the previous layers when you try to apply more. With this baby underneath, that doesn't happen. It grabs onto and intensifies the pigment of your eyeshadow. Love. Amor. Sarang. Adore <3 Us UK girls don't have as many options as the US girls when it comes to finding bases at drugstore prices, so this is really useful.
I find these easily last the school day with only minimal creasing on myself, sans primer underneath, and after that they fade rather than crease.

The price is great, the company is wonderful and they perform well. Ten out of ten points.

T-shirt Laddering


Tuesday, March 29, 2011

Bundle Monster releases another image of their new plates!!

Here's the newest image plate Bundle Monster will be adding to their new collection. If you haven't heard- Bundle Monster is releasing a new set of 25 image plates that will have BIGGER full sized images. The first set will still be available & the new set will have similar pricing. They should be available in about 2 weeks and BM recently got their sample plates to test. You can visit Bundle Monster's Facebook page for more info.

BM also said that this new set will have lots of full sized images and french tip designs- I like the full sized images, but I'm honestly not that into french tip designs. I am still sooo excited for the set and I do like the bottom two designs, along with the leaf one. What about you? Which designs do you like on this plate? Do you like full sized images or french dip designs more?

I'm Back!

I was actually back on Sunday/Saturday, but was far too knackered to post, and school is seriously arsewhipping me at the moment so I couldn't post on Monday, either - sorry.

I recieved the freebies from that The Sun Buzz promotion today, actually. I did send off for two (no, I'm not being greedy, I was going to add it to an upcoming Barry M giveaway prize pack!) but I only got one. I figured it would happen, to be honest, as they usually only let you claim one for these things, don't they? Even though I purchased two copies. And I don't read the Sun. *shudder*. Still, it's a pretty decent offer, isn't it? Only one token to collect, and you get £9 worth of Barry M products for the cost of one paper! I think it was about 80p? 60p? Can't quite remember. It was cheap! The magazine inside was worth a read, but the actual newspaper...no. Just no.

SAM_7845
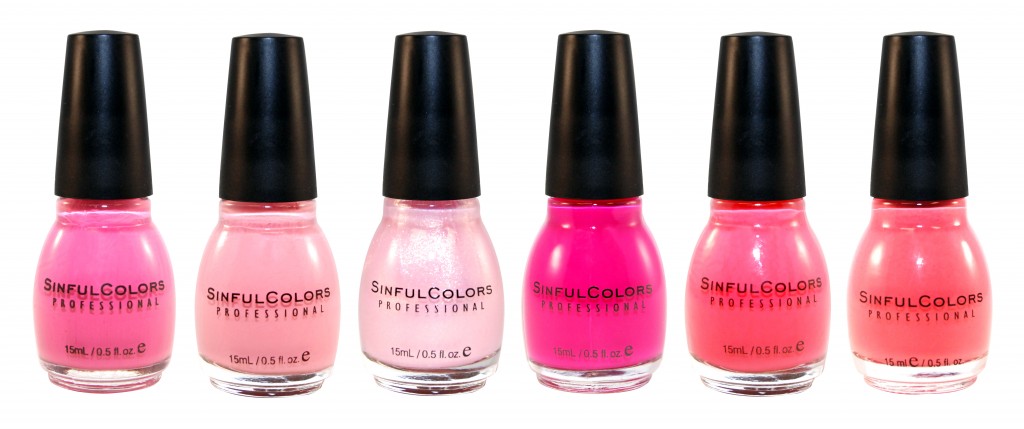
A rather craptastic photograph. Sorry guys, I'll retake them if I have an in depth look at the products.

I bought the copies of the paper on Saturday. My Mum came back from the airport having purchased two copies (at the airport, naturally) - but oddly, they were lacking the magazine inside - which was the part that I needed! I then made a mad rush to the local newsagents and bought two more, which did have the magazine inside, cut out the tokens, and then gave one to my Mum who was going up to town to get herself a new pair of shoes. I kept the other as I had an orchestra rehearsal at school (on a flipping Sunday, call ourselves a Catholic school) the next day. I reasoned that I could quickly pop into the Superdrug there, exchange the token and pick up a couple of makeup items while I was there.

Unfortunately, I went down there to find that all the stock had vanished within the first hour - on Saturday. My Mum reported the same thing. So we'd have to send it to the Sun Buzz offices (at our own cost) to redeem the tokens. Great.
I do feel like the Sun Buzz should have seen it coming. It's a one day thing (as in, you don't have to go and collect all the tokens over x number of weeks) and it's a very popular newspaper - many women and men read it, and were likely to take the offer up. Therefore, they should have, or the people in charge of that decision should have manufactured and distributed more sets so that readers wouldn't then have to send it off at their own expense.

I'm probably just being ungrateful though. The products do look really nice. I know that the lipgloss will never suit me, so I've put that away for a giveaway/swap/love package use, but I think the nail polish colour is rather unique and everyone loves a black eyeliner.

EDIT: Today, I recieved the second package - so the Sun Buzz are honouring all tokens, and it's been added to the giveaway prize ;)
Did any of you guys take up this offer? Did you manage to get it instore or did you have to send off for it?

Lace-Front Reconstruction Shirt Tutorial


Monday, March 28, 2011

Cute Pink & Yellow Spring Nail Design & Tutorial


This nail design was unplanned except for the fact I knew I wanted to do something for Spring. I was searching through my image plates and the flower design on my BM16 plate caught my eye as it always does. I just never used this design because I knew the full image wouldn't fit over my entire nail. (Thank god Bundle Monster will have bigger images on their next set!) But I really wanted to use this design so I figured out a way to make it work. I also made a tutorial if you wanted to know how to do this design. =)

Yellow Color: Sinful Colors "Unicorn"
Pink Color: Sinful Colors "Pink Forever"
Image Plate: BM16 (Bundle Monster)
Mircro Beads: Ebay.com & DollarNailArt.com


Top Fashion Trends For Women

Looking for trends in women over winter fashion for 2011? This year's lively style military, bold design, stylish tuxedo jackets and sweaters in soft tissues are styles of winter.

White Military Style

Elegantly cropped military jackets, military style pants nervous there are countless ways to incorporate this trend into your wardrobe. The integration of a range of green, olive, gray and dark gray in your closet and invest in a closet of some key pieces, including a military-style jacket or coat, military style trousers and a pair of overhead cone heel of the military-inspired boots.

Bold Graphic Prints

Add some bold and graphic prints in our wardrobe to create a hip and looking nervous. Fitted t-shirts, long sleeve shirts, skirts and dresses in one piece are the best options for bold and graphic prints. When you choose a garment with a printer model look or something with a touch of art, including bold lines, watercolor retro look nervous or even slightly forms and templates.

Whether you wear a dress printed with bright colors and artistic design and print graphics or nervous elegant long-sleeved jacket with a military style, do not forget to add some highlights of beautiful jewelry. cuff bracelets, necklaces with pendants and rings are divine vintage accessories to wear with a bold or a pattern.

Elegant tuxedo jacket

This is the year of the smoking jacket. Long lines and tapered design of the tuxedo jacket creates a graphical look long and slim flattering. The best part of this fashion trend for winter, it works great as a layered look. Use an elegant tuxedo jacket over a long sleeve shirt or attractive graphics. Add a pair of jeans or leggings to create a stylish layered look great for the winter season.

Do not forget to personalize! Add to that a pair of long leather boots, a silk scarf and a bright gold bangles complete the look. The search key in a chic tuxedo jacket is to keep a tight style that falls just past the hips. Keep it simple, elegant two or three layers with additional accessories.

Swimwear airbag in the long

There is nothing more divine than wearing a sweater soft tissue used in your best pair of jeans and more comfortable. The Cardigans with V-neck sweaters are the best to wash and wear, and every time you use it. Black, white, gray and cream are the best choices of color and function as key elements in your wardrobe, as the neutral color palette is extremely flexible and free.

Use a soft knit sweater over a pair of leggings, jeans or trousers. Add a pair of boots with laces, elegant gemstone jewelry vintage style clumsy and a fanny pack to complete the look.

This winter, the four top fashion trends for women are military-style jackets, tuxedo bold design, sweaters and soft tissue long and elegant. Investing in one or two key elements that blend well with your wardrobe. neutral colors are often the best way to incorporate the latest fashion trends in contemporary style.

Haute Couture For 16 Plus

If your fat and your waist is 16 years and over, while still not decided when you wear designer clothes. Sometimes women do not wear fashionable dresses fat because they think that fashionable clothes are not suitable for them, but do not worry here is the collection of designer fashion for fat women. This is the ultimate collection of fashion in the fashion that is best for your lifestyle.

Sunday, March 27, 2011

Sparkly & Starry Glitter Pedicure Design


Blue Color: Milani - "Blue Flash"
Stars, Rhinestones, & Beads: Ebay.com, DollarNailArt.com, Joanns.com

I recently bought some new polishes and Milani's "Blue Flash" was one of them. This polish reminds me of a color Alice would wear in her Wonderland. Well this color and OPI's "Absolutely Alice"- but sadly that color isn't a part of my collection so this is the closest to wonderland I'll get. lol The first picture I took in the shade and is more color accurate to this polish. But I just had to see what this color looked like in the sun- which was a light show spectacular-although for some reason my camera picked up a darker less sparkly color. This color was pretty enough to wear on its own, but if you know me, I just had to add something on there. I figured a star design would work good with the colors. What do you think?

New Polish Additions =) & Quick Reviews

I was checking out Ivana's Blog recently when I chose her nail design for my NOTW and was looking at some of her recent polish purchases and swaps. She is a slightly bad influence on me since we have the same taste in polishes (especially when it comes to pinks and purples) and I just had to get some of the polishes I saw on her blog. =) lol

Above we have Milani polishes which I was surprised to find at my local Walgreens. The last few times I went there, I don't even remember seeing their Milani displays- but this time I got lucky. Here's what I got...

Milani - "Purple Gleam"
Milani - "Gold"
Milani - "Blue Flash"

*Close Up*

 Purple Gleam & Blue Flash are part of Milani's "One Coat Glitter" series. I wouldn't say they are exactly one coaters, however, it only takes 2 coats to achieve opaque glittery goodness. Even though 1 coat isn't completely opaque, it would still be too over powering to use as a glitter top coat. These polishes consist of a very fine glitter with a slightly colored base coat from what I could tell. Blue Flash seems to have a clear to light base color, but Purple Gleam seems to have a darker, maybe purple base color. I love both these colors equally- but I have to admit that the purple color is very unique and is absolutely stunning with some top coat. Overall, these are by far my favorite glitter polishes along with Sally Hansen "Rockstar Pink." I never had any glitter polishes that were this jam packed with glitter, and if that is the look you are going for- these polishes would be perfect for you.

As for Milani's Jewel FX polish in "Gold" - this is a clear polish that is loaded with small hexagonal glitter. It looks very cute over any polish and can add extra sparkle to any nail design. I tried this color out on a swatch wheel over a few colors and it is so pretty. I already have an idea for how I am going to use this polish for a Christmas design. I am not sure how many coats it will take to be opaque- my guess is around 3-4- but I will do some research and update this post when I find out. =)


Next up are some OPI polishes from the Katy Perry collection that my bf was sweet enough to buy me. =) I found these at Trade Secret (the only place I know where to buy OPI in my state) and these were the two prettiest colors left on the display. I couldn't choose between the two because they were both unique in their own way, so I snagged both. Pictured above is..
OPI - "The One That Got Away"
OPI - "Teenage Dream"


Close Up

"The One That Got Away" is almost as hard to describe as it was to get a color accurate picture. It's a redish - pinkish - berryish color with flecks of gold and purple shimmer. It's one of those colors that put you in a trance when you move it around in the light. As for "Teenage Dream"- this is a glitter polish with a clear base that has very small fine glitter in a pinkish, purple, mauve color, along with bigger glitter shapes that are silver with rainbow reflects. With the perfect combination of glitter sizes and color- Teenage Dream is a step above your regular glitter polishes. It is more on the sheer side, so it will take a few extra coats to achieve the bottle color. But as you can see from the close up pic, it is well worth it.

Do you have any polishes from these collections? How are you liking them so far? I really want more colors of the Milani glitter polishes, or better yet, get my hands on their 3D polishes. =)

Labels